
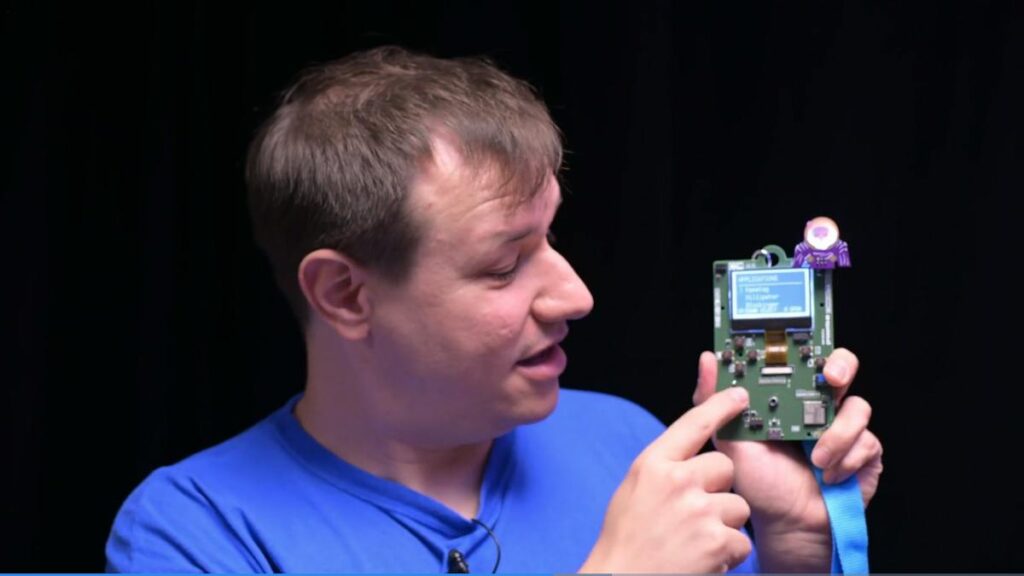
Most electronics students never ship a finished product. Breadboard demos get graded, then dismantled. A conference badge flips that: it is a real PCB you design, solder, wear around your neck, and hand to strangers who immediately press every button on it. Clem Mayer’s Community Badge shows how much mileage a small board can give you, because the same lanyard-ready PCB that shows your name by day turns into a handheld game console by night.
What Mayer built
Mayer, who makes videos for element14 Presents, kept the maker-badge traditions intact. There is no enclosure; every component sits in plain view on the PCB. A lanyard loop is routed into the top edge, and there is an SAO (Simple Add-On) header so other people’s blinky modules can plug straight in. The twist is the input layout. He added a d-pad plus A and B buttons, then wrote six games for it: Millipeter, Blockinger, Brechaus, Personal Space Invaders, Frickin Bird, and Roadkill. You can probably guess the originals. The badge runs them on a 128×64 monochrome LCD, a lower resolution than the original Game Boy’s 160×144.
The technical side
The brain is an ESP32-S2, a single-core Xtensa LX7 clocked up to 240 MHz with 2.4 GHz Wi-Fi and native USB OTG. That native USB matters: you flash it over a plain USB-C or micro-USB connector with no UART bridge chip, which saves board space and a few hundred pesos per unit. Power comes from 2 AA cells, roughly 3.0 V fresh and dropping to about 2.4 V near the end, so a boost or LDO stage sized for the ESP32-S2’s 3.3 V rail is part of the design. Mayer chose AA over lithium on purpose; airport security is far happier with alkalines than with a loose LiPo pouch. The SAO header follows the standard 2×3 layout: 3.3 V, GND, SDA, SCL, and two spare GPIO lines, so I2C add-ons work without extra wiring.
Build your own
For a hackathon team or a thesis group, a badge is a tidy project because the scope is fixed by the form factor. Start with an ESP32-S2 module such as the ESP32-S2-WROOM, a 128×64 SPI or I2C LCD (a 1.3-inch SH1106 OLED is a cheap stand-in while you prototype on a breadboard), seven tactile switches for the d-pad and buttons, a 2xAA holder, and a 3.3 V boost converter. Pull-up resistors around 10 kOhm on each button line keep the inputs from floating. Watch the gotcha with the ESP32-S2: it is single-core, so a game loop that redraws the full LCD buffer every frame leaves little time for Wi-Fi; redraw only the dirty regions or drop the radio while playing. Write one game first, then let teammates add theirs as separate modules. The write-up and video live on element14 at community.element14.com, with Hackster’s coverage at hackster.io. If your school’s robotics club has a meet coming up, a batch of 10 badges is a cheaper and far more memorable team uniform than printed shirts.
Frequently Asked Questions
What microcontroller and display does the Community Badge use?
It runs on an ESP32-S2 (single-core Xtensa LX7 up to 240 MHz, 2.4 GHz Wi-Fi, native USB) driving a 128×64 monochrome LCD, with a d-pad and A/B buttons for the six built-in games.
Why does the badge use AA batteries instead of a LiPo pack?
Two AA cells are easier to carry through airports and swap at a venue than a lithium pouch. The trade-off is a 2.4 to 3.0 V supply, so the board needs a boost or regulator stage to feed the ESP32-S2’s 3.3 V rail.
What will I learn if I build this?
You practice PCB layout with mechanical constraints (lanyard loop, SAO header, button placement), battery power design for a 3.3 V microcontroller, SPI or I2C display driving, debounced button inputs with pull-ups, and writing a simple game loop in C++ or MicroPython on a single-core chip.
