
What you’ll need on the bench
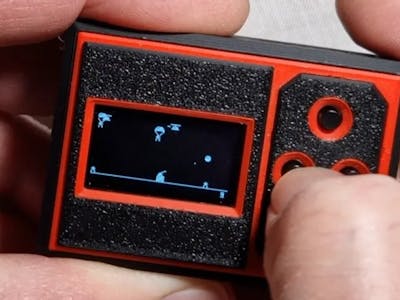
Want a game console small enough to hang off your keys? Ronald Nelson’s Pic-O-Pocket squeezes one into a 5.5 x 4 x 2 cm shell, and the parts list is short enough to raid from a single drawer. Grab a Raspberry Pi Pico 2 W for the brains and Wi-Fi, a small OLED display, four tactile buttons, a rechargeable LiPo cell with a USB charging module, a slide switch to cut power when it is idle, and a tiny speaker. A single transistor and a couple of resistors finish the bill of materials.
Nelson did not start from a blank breadboard. He remixed an existing open source handheld, reworked the enclosure to fit the speaker, and wrote a fresh operating system from scratch. The finished unit runs 13 built-in games, including Pong, Breakout, and Tic Tac Toe, plus a clock, weather, timers, alarms, a stopwatch, and a small music player. The whole OS lands at roughly 52 KB.
The clever bits under the shell
Two design choices are worth copying. First, the audio: instead of wiring the speaker straight to a GPIO pin, Nelson drives it through a transistor so it plays much louder while shielding the Pico from excessive current draw. Second, the safety net. He taps the thermistor already built into most LiPo packs, feeds it to one of the Pico‘s analog inputs through a voltage divider, and watches the battery temperature. Cross 55 degrees Celsius and a background routine shuts the console down until it cools, protecting both the cell and the PLA case.
The custom OS earns its keep beyond launching games. It reports battery and memory stats, CPU info, and uptime, offers configurable screen timeouts, runs screensavers to fight OLED burn-in, and drops into deep sleep automatically to stretch runtime. Once it joins your Wi-Fi, it syncs the clock over NTP and pulls local weather.
Build one this weekend
Nelson published everything: source code, circuit diagrams, a build guide, and the enclosure files. Read the full write-up on Hackster, then wire the OLED to the Pico‘s I2C pins (SDA and SCL) and breadboard the transistor audio stage before you reach for the soldering iron. If the speaker stays quiet, check the transistor base resistor first, it is the usual culprit.
Frequently Asked Questions
What microcontroller powers the Pic-O-Pocket?
A Raspberry Pi Pico 2 W. It supplies the processing and the built-in Wi-Fi that handles the NTP clock sync and local weather pull.
Why route the speaker through a transistor instead of a GPIO pin?
Driving a speaker straight from a GPIO pin limits volume and risks overloading the microcontroller. A transistor lets the speaker play much louder while protecting the Pico from excessive current draw.
What will I learn if I build this?
You’ll practice I2C wiring for the OLED, transistor-driven audio, reading a LiPo thermistor through a voltage divider, and writing embedded firmware. Those skills transfer straight to thesis and capstone hardware.
