
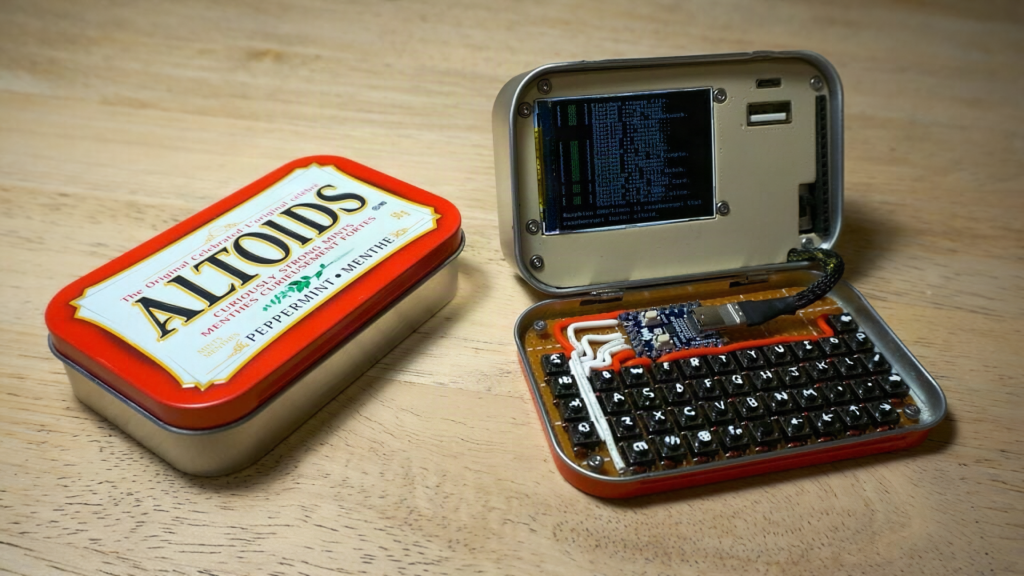
Cramming a whole computer into an Altoids tin looks like a party trick, but the tight space is exactly what makes it worth building. Every millimeter forces a real decision about power, layout, and which GPIO pins you can actually reach. That kind of constraint teaches more about practical electronics than any roomy project box, which is why a pocket cyberdeck makes a strong portfolio piece for an ECE or robotics student.
What the build packs in
Maker Mason, who posts as Exercising Ingenuity, squeezed a Raspberry Pi Zero, a 2-inch LCD, and a hand-built keyboard into a single mint tin. The keyboard is a dot-matrix layout soldered onto protoboard, driven by a Waveshare RP2040 Zero acting as its own microcontroller so the Pi does not have to scan the keys itself. A UPS HAT and a small battery make it run untethered, and a tiny USB hub adds an external port. Fifteen GPIO pins are broken out on the outside of the tin for on-the-go hardware hacking, with the labels engraved straight into the metal.
The tricky parts
The leftover 2-inch screen refused to work with the newest Raspberry Pi OS, so Mason dropped back a couple of OS versions and edited display settings through raspi-config until it behaved. Space was the other enemy. He desoldered unused components from both the RP2040 Zero and the Pi Zero, then joined parts directly together instead of running wires, which saved several precious millimeters. The 5V UPS HAT and battery had to share the same cavity as everything else, and even the hinges needed reshaping to close.
Build a smaller one yourself
You do not need a tin to start. Grab a Raspberry Pi Zero (or a Zero 2 W for more headroom), a 2-inch SPI LCD, a UPS HAT, and any RP2040 board to run a key matrix. A few gotchas from this build worth stealing:
- Test your LCD against your exact OS image before you commit the wiring. A driver that worked last year may not load on the current release.
- Keep the full 40-pin header accessible if you can, or at least break out the SDA and SCL lines for I2C add-ons later.
- Direct board-to-board soldering saves room but makes rework painful, so flash and test each module first.
Mason wrote the full build up in Raspberry Pi Official Magazine #167, which is free to read online. See the original feature at raspberrypi.com for the wiring shots and the beige faceplate that ties the whole thing together.
Frequently Asked Questions
What drives the keyboard on this Altoids tin cyberdeck?
A hand-built dot-matrix keyboard soldered onto protoboard, scanned by a Waveshare RP2040 Zero acting as its own microcontroller so the Raspberry Pi Zero does not have to poll the keys itself.
What parts go into the build?
A Raspberry Pi Zero, a leftover 2-inch LCD, a UPS HAT with a small battery, the RP2040 Zero keyboard controller, a tiny USB hub, and 15 GPIO pins broken out through the side of the tin for hardware hacking.
What will I learn if I build this?
You will get hands-on practice wiring an SPI display, matching a screen driver to the right Raspberry Pi OS version through raspi-config, managing battery power with a UPS HAT, tight-space soldering, and breaking out GPIO for I2C and SPI add-ons.
