
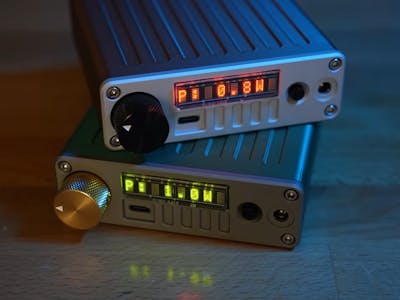
A bench power supply is one of the first tools an electronics student wishes they had at home, yet most units are heavy, mains-tethered, and too big for a dorm desk. That gap is what Ben Makes Everything set out to close with a portable supply that fits in one hand and runs off a battery, so you can probe a circuit at your workbench or on the ride to class.
The device works like a USB power bank with a brain. Instead of a fixed 5V, it delivers adjustable voltage with live current monitoring, giving you the same control as a benchtop unit in a package the size of a deck of cards. A rechargeable pack means no wall outlet, and a micro-LED fuel gauge shows how much runtime is left before you need to top it up.
What’s inside the enclosure
The output ranges from 0.8V to 22V, wide enough for a 3.3V sensor rail or a 12V motor test. Charging happens over USB-C Power Delivery, and energy comes from a 4500mAh 4S1P lithium-ion pack. The heart of the build is a Microchip ATtiny3216, an 8-bit microcontroller that reads a rotary encoder for user input and drives an HCMS-297x LED display for status readouts. Ben packed the power management, charging, regulation, and current-sensing ICs onto a single custom PCB, which is the only way to keep the whole thing this small.
Build it yourself
This is a solid intermediate project if you are comfortable with SMD soldering and reading a datasheet. You will need:
- A Microchip ATtiny3216 and a UPDI programmer to flash the firmware
- An HCMS-297x LED display and a rotary encoder for the front panel
- A 4S1P lithium-ion pack near 4500mAh plus a USB-C PD charging IC
- The custom PCB gerbers and firmware from Ben’s GitHub repo
The enclosure pairs a 3D-printed body with a CNC-milled aluminum faceplate, and the faceplate prints fine too if you have no mill. Grab the full source files from the original build write-up on Hackster and start by ordering the PCB.
Frequently Asked Questions
What voltage range does this portable power supply provide?
It outputs anywhere from 0.8V to 22V with live current monitoring, so it covers a 3.3V sensor rail up to a 12V motor test, all drawn from a 4500mAh 4S1P lithium-ion pack that charges over USB-C PD.
Which microcontroller runs it, and how hard is the build?
A Microchip ATtiny3216 reads the rotary encoder and drives the HCMS-297x LED display. It is an intermediate build that needs SMD soldering, a UPDI programmer to flash the chip, and a custom PCB ordered from Ben’s gerbers.
What will I learn if I build this?
You will practice SMD soldering, power-management PCB design, USB-C PD charging, and writing firmware for an AVR microcontroller that reads an encoder and drives an LED matrix. That is a compact tour of skills every ECE thesis bench needs.
