
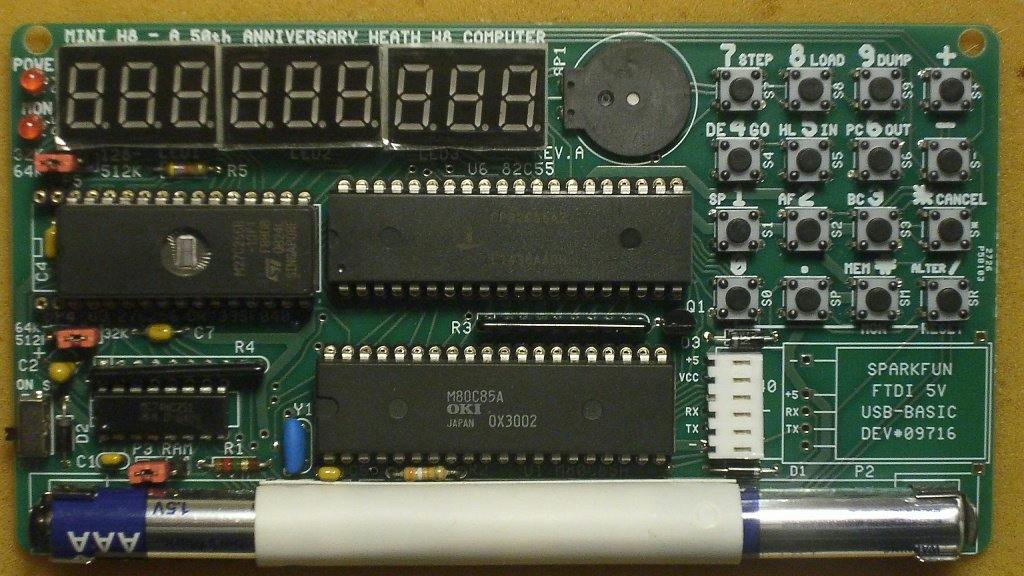
To build an H8 Mini you need a soldering iron, a 6 x 3 inch through-hole PCB, an 80C85 CPU, a 82C55A I/O chip, nine 0.3-inch seven-segment displays, a 4×4 keypad, and either three AAA cells or a USB-to-serial adapter for power. Every part is through-hole, so there is no hot-air station and no microscope in the shopping list.
What you are actually building
Lee Hart and the Society of Eight-Bit Heath Computerists designed this palm-sized cousin of the 1977 Heathkit H8, which sold as a $379 kit around an Intel 8080. The Mini is real hardware, not an emulator hiding on a modern microcontroller. Hackster’s write-up is at hackster.io, and it points to Lee’s full build notes.
The front panel keeps the original feel: nine glowing digits, sixteen keys, and a small piezo speaker for beeps and musical scales. Memory is 32K of RAM plus a 32K EPROM, and an optional flash ROM stretches that to 512K.
The technical bits worth studying
The 80C85 runs at 2 MHz. Serial does not use a UART at all. The CPU bit-bangs data through its SID and SOD pins, which is a neat trick for anyone who has only ever called Serial.begin(9600) on an Arduino. Here the link runs at 2400 baud, and the software handles the timing.
The 82C55A peripheral interface drives the displays, keypad, and speaker. The LEDs are multiplexed, so the firmware scans one digit at a time fast enough that your eye sees all nine lit. If you have debugged a flickering 7-segment on a breadboard, the idea is the same, just done in 8085 assembly.
Software is still in progress. The monitor mixes Heath’s PAM-8 with GW-MON-80, and the plan is patched PAM-8 plus Benton Harbor BASIC, with the flash ROM acting as a disk for CP/M and HDOS. An optional 3D-printed case copies the original H8 look, but the bare board is the better teaching tool.
Wrap-up for classrooms and thesis benches
For ECE students, this is a cheap way to see an address bus, a data bus, and chip-select logic on a board small enough to hold in one hand. Pair it with a logic analyzer, probe the SOD pin during a serial transfer, and compare what you capture with the 2400-baud timing. Then browse our Arduino and sensor modules at circuit.rocks for the modern side of the same lesson.
Frequently Asked Questions
What processor does the H8 Mini use?
An 80C85 running at 2 MHz, with 32K of RAM, a 32K EPROM, and an optional flash ROM that raises storage to 512K. An 82C55A chip handles the displays, keypad, and speaker.
Do I need SMD soldering skills to build it?
No. The board is fully through-hole, about 6 x 3 inches, with nine 0.3-inch seven-segment displays and a 4×4 keypad. Power comes from three AAA batteries or a USB-to-serial adapter.
What will I learn if I build this?
You learn how a CPU talks to RAM, ROM, and I/O over buses, how multiplexed LED displays work, and how bit-banged serial works through the SID and SOD pins. It suits ECE coursework and computer architecture labs.
