
Want to spin tracks without dropping hundreds on commercial gear? Here is what you would need to put together a working two-deck controller for roughly the price of a pizza night. The shopping list is short: an Arduino Pro Micro, two rotary encoders, five potentiometers, five arcade-style buttons, a spool of solid copper wire, and access to a 3D printer for the jog wheels and enclosure. Total damage lands near $30, plus a free weekend.
What the maker built
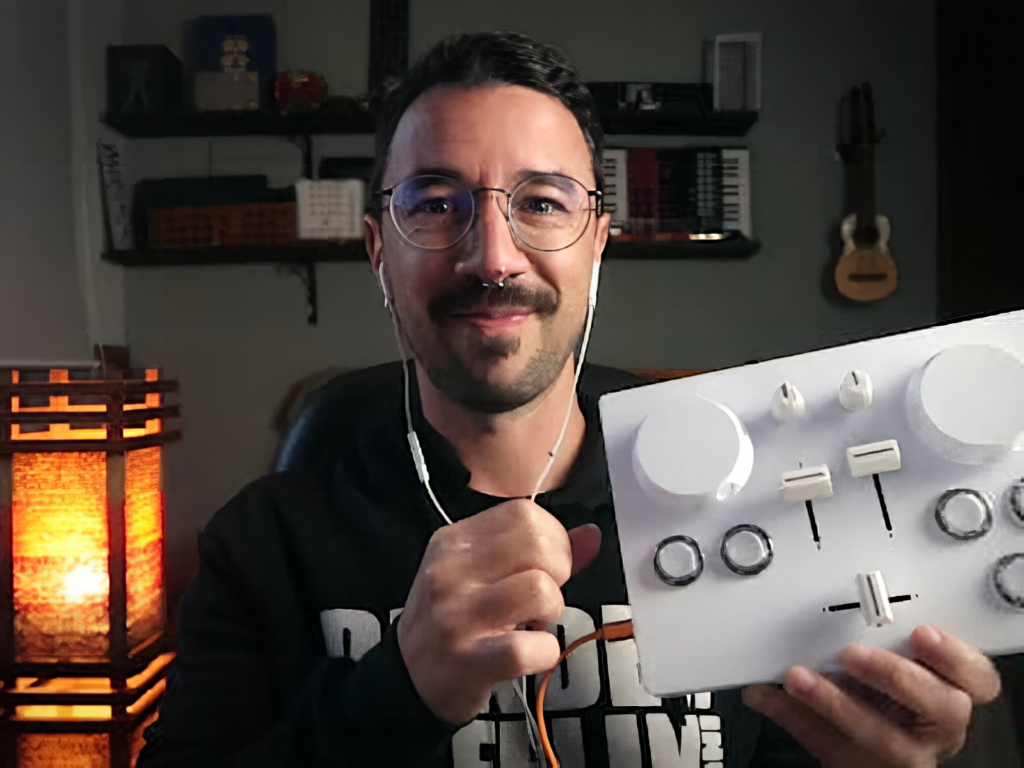
Nerd Musician set out to prove that a custom DJ rig does not have to be expensive. Instead of buying off-the-shelf hardware, the build leans on cheap, easy-to-source parts and a heavy dose of DIY ingenuity. The result is a dual-deck controller with two large 60mm printed jog wheels, faders and filter knobs, and programmable arcade buttons for play, cue, and shift. Because every part is chosen and wired by hand, the whole thing can be tuned exactly to the builder’s taste.
How it works under the hood
The brain is an Arduino Pro Micro, which can act as a native USB MIDI device on its own. The clever bit is that the layout uses every available pin directly, skipping multiplexers or expansion boards entirely to keep both cost and complexity down. Rotary encoders handle the jog wheels, the potentiometers cover deck volume, audio filters, and a crossfader, and the arcade buttons fire off control commands.
To tame the wiring, exposed copper bus wires act as shared power and ground rails, so individual components tap into common lines instead of running a rat’s nest of cables. The control layout was first arranged in the web-based MIDI Controller Builder app, then exported to 3D print the top panel, bottom shell, and custom jog caps. After flashing the firmware through the Arduino IDE, the device shows up to any computer as a class-compliant MIDI controller, with a special output mode that feeds Traktor the relative encoder data it expects.
Worth a weekend
For around $30, you end up with a controller that mimics a lot of what pricey commercial decks offer, while staying fully open to tweaks and upgrades. It is a satisfying entry point into MIDI, microcontrollers, and 3D-printed enclosures all at once. Got an Arduino and a printer gathering dust? This is a great excuse to fire them up.
Frequently Asked Questions
What microcontroller powers this DJ controller?
An Arduino Pro Micro, which can act as a native USB MIDI device on its own. The design uses every pin directly, avoiding multiplexers or expansion boards to keep cost and wiring complexity low.
How much does the build cost and what parts are needed?
Around $30 in parts: the Pro Micro, two rotary encoders, five potentiometers, five arcade buttons, solid copper bus wire for shared power and ground rails, and 3D-printed jog wheels and an enclosure.
What will I learn if I build this?
You’ll get hands-on with USB MIDI and the Arduino IDE, learn to map encoders, pots, and buttons to musical controls, practice simplified wiring using shared copper rails, and design and 3D-print a custom enclosure.