
What you’d need on the bench
A shuttlecock server breaks down into three subsystems you can price out separately: a feeder that isolates one shuttle at a time, a pair of counter-rotating wheels that grip and fling it, and a microcontroller keeping the timing honest. For a first attempt, budget an ATmega328P board, two motors with speed controllers, a 12V supply rated around 5A, a solenoid valve if you want a pneumatic gripper, and a hopper cut from acrylic. Everything after that is tuning.
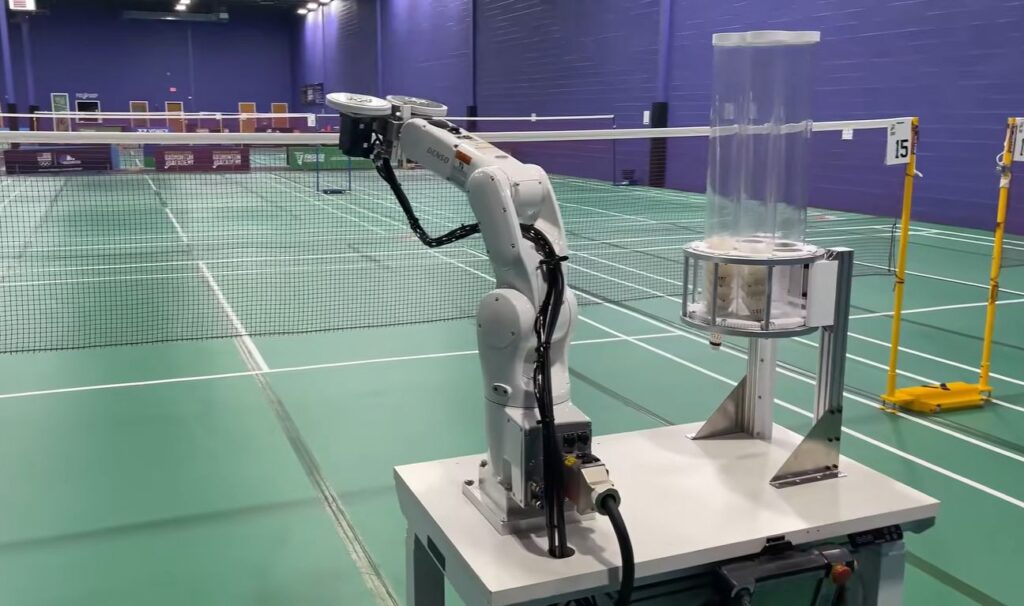
Travis Mitchell spent years circling this problem before landing on an unusual answer: bolt the job onto a retired industrial robot arm. He converted a Denso VS050, a compact 6-axis arm small enough to sit on a height-adjustable desk, and gave it two duties. First, pluck a fresh shuttlecock from the hopper with a pneumatic grabber. Second, feed it into the spinning discs that do the launching. Denso publishes a CAD model of the arm, which meant the mounting brackets could be designed against real geometry instead of caliper guesses.
The part that decides whether it works
Mitchell started with a Raspberry Pi Pico and switched to an ATmega AVR partway through. The reason was pin count and I/O behaviour, not raw speed: talking to an industrial arm means juggling handshake lines, limit signals, and valve triggers at the same time, and the AVR gave him the headroom. That is a useful gotcha for anyone planning a build around a Pico because it is cheap. Count your GPIO needs on paper first.
The other make-or-break detail was the launch discs. Two wheels spinning at high speed have to be balanced against each other, and any material that stretches under load throws the shuttle off line. A rigid plastic disc with a silicone strip bonded to the rim ended up as the winning combination — grip from the silicone, dimensional stability from the disc underneath.
Where to take it next
Most makers do not have a spare Denso arm, but the launcher half of this project scales down cleanly. Two 775 DC motors, a pair of PWM-driven ESCs, and a gravity-fed chute will serve shuttles well enough to drill footwork, and the whole control loop fits in a few hundred lines on an Uno. Add an ultrasonic or IR sensor at the chute to confirm a shuttle actually dropped before firing, otherwise you get dry cycles that look like a jam. Watch the full build writeup and video, then wire up two motors and a hall sensor on a breadboard and see how repeatable your throw speed is before you commit to a frame.
Frequently Asked Questions
Why did this build switch from a Raspberry Pi Pico to an ATmega?
Driving an industrial arm means handling handshake lines, limit signals and valve triggers at once. The ATmega AVR offered more usable I/O for that job, so the choice was pin count and I/O behaviour rather than processing speed.
What makes the launch wheels so fussy?
The two discs spin fast and must stay balanced against each other. Any material that stretches under load sends the shuttlecock off line, so a rigid plastic disc with a bonded silicone strip on the rim gave grip without losing its shape.
What will I learn if I build a scaled-down version?
You will practise PWM motor control, ESC wiring and power budgeting for a 12V rail, plus sensor debouncing if you add an IR or ultrasonic feed detector. It is also a solid lesson in mechanical tolerance, since the same code behaves differently once the wheels go out of balance.
