
A piso wifi is a coin-operated internet station. Drop a coin, get a block of time online. It’s one of the easiest small businesses to run in the Philippines because the hardware is cheap and the software is free.
Most local builds run LPB Piso WiFi, a free firmware image that flashes onto a small single-board computer. The board handles the timer, the rates, and the admin page. A coin acceptor tells the board when someone paid.
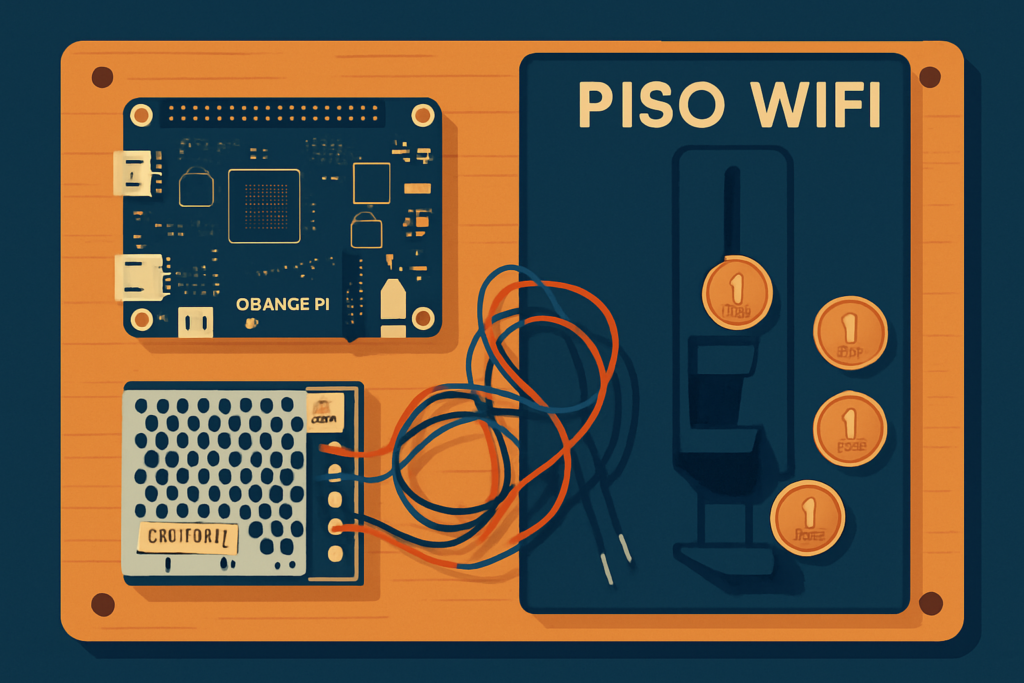
This guide covers the full build: parts, wiring, and first-time setup. Every part links to a component we keep in stock at Circuitrocks.
The parts list
| Part | Why you need it | In stock |
|---|---|---|
| Orange Pi One 1GB (or Orange Pi PC) | Runs the LPB firmware. The One is the common budget pick; the PC has more ports. | Orange Pi One 1GB · Orange Pi PC |
| microSD card (8GB+) | Holds the firmware image. Class 10 or better. | microSD reader for flashing |
| Coin acceptor | Reads coins and signals the board. Programmable type lets you set which coins count. | Multi-Coin Selector · Programmable 4-Coin |
| 5V power supply | Powers the board and the coin acceptor. The 30A unit has headroom if you add more. | Switching Power Supply 5V 30A |
| DC power cable | Connects the supply to the Orange Pi barrel jack. | Orange Pi USB-to-DC cable |
| LAN cable | Links the board to your router or modem for internet. | Cat5 RJ45 LAN cable |
| Enclosure | Keeps it dust-free and tamper-resistant. | Orange Pi One Acrylic Case |
You also need a working internet line (fiber, DSL, or mobile hotspot) and a router the piso wifi can sit behind.
How it goes together
- Flash the firmware. Download the LPB Piso WiFi image, write it to the microSD with a tool like balenaEtcher, then put the card in the Orange Pi.
- Wire the coin acceptor. The acceptor has a signal wire that goes to a GPIO pin on the board, plus power and ground. Match the acceptor to 5V. Confirm the exact pin against the firmware version you flashed.
- Power up. Connect the 5V supply through the DC cable. The board boots straight into the piso wifi system.
- Plug in the internet. Run the LAN cable from your router to the Orange Pi.
- Open the admin page. From a device on the piso wifi network, go to http://10.0.0.1/admin in a browser. That’s where you set rates, time per coin, and the pause feature.
Setting your rates
The admin page is where the money decisions happen. Common starting point: 1 peso for a few minutes, with bigger coins giving proportionally more time. Test with real coins before you put it out.
The pause time feature is worth knowing. It lets a customer stop their timer and come back later without losing minutes. A lot of the searches for “10.0.0.1 piso wifi pause time” are people looking for exactly this setting, so it’s a real selling point for your customers.
Run it 24/7 once it’s stable. The board sips power and there’s no reason to switch it off overnight.
Build it with parts that are in stock
Everything in this guide ships from Circuitrocks. Start with the Orange Pi One and a coin acceptor, add the 5V supply, and you have the core of a working piso wifi vendo.
Frequently Asked Questions
Is LPB Piso WiFi free?
Yes. The LPB firmware image is free to download and use. You only pay for the hardware – the Orange Pi, coin acceptor, 5V supply, and cables. All of those ship same-day from Circuitrocks.
Can I use a Raspberry Pi instead of an Orange Pi for the build?
Some builds adapt to Raspberry Pi, but the LPB image is built around the Orange Pi One and Orange Pi PC, so those are the safe choice. The GPIO pin map and firmware tuning are matched to those boards specifically.
What will I learn if I build this myself?
GPIO wiring for a coin-acceptor signal line, single-board computer firmware flashing, LAN-side network admin, and the basics of running a coin-operated kiosk. Once you understand the LPB flow, the same skills carry over to vending-machine projects, library kiosks, and any timer-gated access system.