
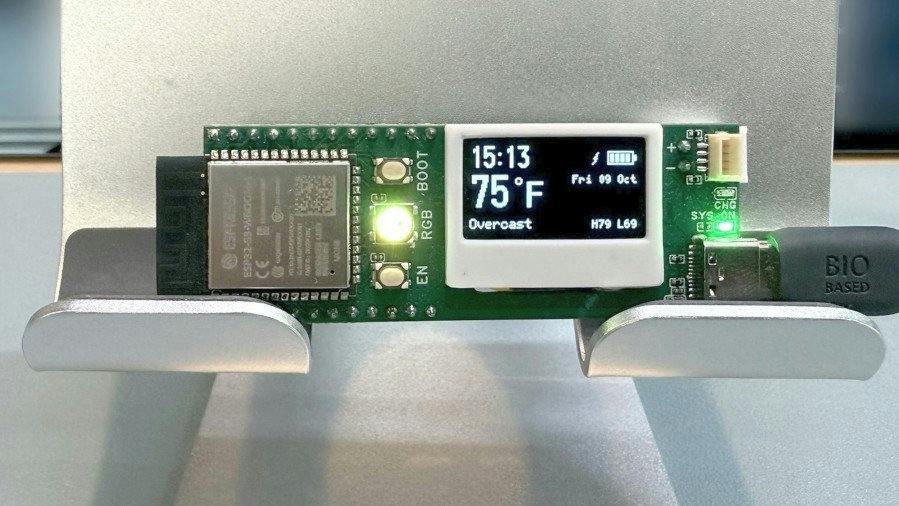
Picture the usual ESP32 desk clock on a student’s table: a dev board, a separate 0.96″ OLED module, a TP4056 charger board, and a nest of jumper wires that works loose every time someone bumps the breadboard. Engineer Hao Wen got tired of that pile and designed the Crescent City Dev Board to replace it, now headed for a Crowd Supply campaign.
What Hao Wen built
Crescent City is a breadboard-friendly carrier for an ESP32-S3-WROOM-1-N8 module with three things already soldered on that you would normally wire up yourself: a 128×64 monochrome OLED, a lithium-polymer battery connector with charging over USB-C, and a Qwiic/STEMMA QT header for plug-in sensors. Out of the box it runs an open-source Wi-Fi weather clock that shows local time, the forecast high and low, and a four-bar battery gauge estimated from cell voltage. Setup happens from a phone browser, no app required. Plug in an SHT4x temperature and humidity sensor and an example sketch draws live readings with zero soldering.
How it is put together
The ESP32-S3 brings two Xtensa LX7 cores at up to 240 MHz, 512 KB of SRAM, 8 MB of external flash, Wi-Fi 4 and Bluetooth 5 LE. The OLED uses an SSD1306 controller wired over SPI rather than I2C, which keeps the Qwiic bus free for your own sensors. You get 12 GPIO pins broken out, seven of them ADC-capable. One gotcha to plan around: three of those analog pins sit on the ADC block the Wi-Fi radio also uses, so readings on them become unreliable while Wi-Fi is active. Route battery sensing and analog sensors to the other four. An addressable RGB LED and boot and reset pins round it out, and existing ESP32-S3 libraries work unchanged. In the Arduino IDE you select “ESP32S3 Dev Module” from the ESP32 board package; an ESPHome configuration with a browser installer covers Home Assistant users who would rather not write code.
The licensing fine print
Wen has already posted a schematic PDF and a STEP model, but they are source-available with all rights reserved, so you cannot fab your own copy. The firmware and example sketches ship under MIT, which is the part a classroom actually reuses. Know that split before pitching the board for a thesis that may need a custom respin.
The takeaway
For an ECE student, the lesson in this board is scope control. Wen skipped the camera, speaker and second screen; he picked the three parts every small display project wires up anyway and integrated them cleanly. To prototype the same idea today, start with any ESP32-S3 board, an SSD1306 OLED and an SHT4x breakout. The 0.96″ OLED that circuit.rocks stocks is the 128×32 I2C version, so wire SDA to GPIO8 and SCL to GPIO9 and set the display height to 32 in your constructor, then build the weather clock on a breadboard first. Follow the campaign through Hackster’s coverage at hackster.io to see where final pricing lands.
Frequently Asked Questions
What microcontroller and display does the Crescent City Dev Board use?
An ESP32-S3-WROOM-1-N8 module (two Xtensa LX7 cores at 240 MHz, 8 MB flash) driving a 0.96-inch 128×64 SSD1306 OLED over SPI, with a Qwiic/STEMMA QT header, an RGB LED and LiPo charging over USB-C on the same board.
Can I build my own copy from the published schematic?
Not legally. The schematic PDF and STEP model are source-available with all rights reserved. The firmware and example sketches are MIT licensed, so you can reuse the weather-clock code on any ESP32-S3 board you already own.
