
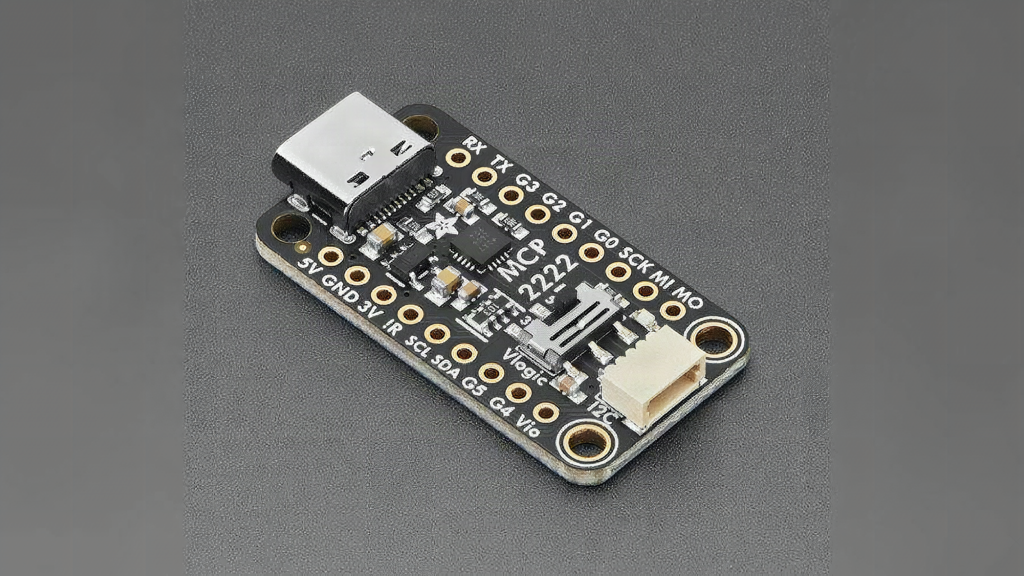
Here is a weekend hack that needs no microcontroller at all: plug a sensor straight into your laptop and read it from a Python script. Adafruit’s new MCP2222 breakout is a USB-C dongle that gives a PC its own I2C, SPI, UART and GPIO pins, so the Arduino sketch, the serial protocol and the upload cycle all drop out of the loop.
What Adafruit built
The board replaces the older MCP2221A breakout, which Microchip has discontinued. It carries a USB-C connector on one end, a Qwiic/STEMMA QT connector on the other, and breadboard-friendly header rows along both edges. A jumper selects 3.3 V or 5 V logic on the GPIO pins, which matters when you mix a 5 V character LCD with a 3.3 V BME280. Compared with the MCP2221A, the new chip adds a hardware SPI bus and more GPIO, so an SSD1306 OLED, a color sensor or a string of shift registers can hang directly off the computer. The pitch is simple: when you only want to confirm that a part works before soldering it into a thesis project, let the PC talk to it directly. Microchip publishes its own MCP2222 Python library, and Adafruit’s CircuitPython-on-any-computer route via Blinka was the whole point of the MCP2221A, so check the Adafruit learn guide for the MCP2222 version before you order.
Parts and cost reality
The breakout sells for $10.95 on the Adafruit store, roughly PHP 650 before shipping, up from $6.50 for the model it replaces. You give up two things for that price. First, the MCP2222 has no ADC and no DAC, so analog pots, LDRs and thermistors still need a microcontroller or an external I2C ADC such as the ADS1115. Second, the SPI bus inserts gaps between bytes, which kills the old trick of driving NeoPixels by modulating MOSI. For a bench setup you will want:
- The MCP2222 breakout and a USB-C cable with data lines (many charging cables do not have them)
- A Qwiic or STEMMA QT sensor, or a breadboard plus pull-up resistors (4.7 kΩ) if your I2C module lacks them
- Python 3 on Windows, macOS or Linux; on Linux you may need a udev rule so the USB HID device is readable without sudo
That is the whole bill of materials: no bootloader, no board definitions, no 115200-baud serial monitor.
Spend your Sunday on this
Wire a BME280 or an MCP9808 temperature sensor to the Qwiic port, then write a 20-line Python script that logs readings to a CSV every 5 seconds. Once it works, swap in the OLED and draw the same number on screen over I2C. The gotcha to watch is bus speed: these USB bridges top out well below a native microcontroller’s I2C clock, so a 128×64 OLED will refresh slowly. If you need analog, add an ADS1115 breakout on the same bus and read all four channels through the same script. The full launch rundown is on Hackster, with Adafruit’s own notes on the SPI limitation.
Frequently Asked Questions
What can the Adafruit MCP2222 breakout do that the old MCP2221A could not?
It adds a hardware SPI bus and more GPIO pins alongside I2C and UART, with a 3.3 V or 5 V logic select, and uses USB-C with a Qwiic/STEMMA QT port. It drops the ADC and DAC that the MCP2221A had, so analog inputs need an external ADC.
How much does it cost and what else do I need?
$10.95 on the Adafruit store, about PHP 650 before shipping. Beyond that you need a USB-C data cable, Python 3 on your computer, and an I2C or SPI sensor or display. No microcontroller, bootloader or Arduino IDE is involved.
What will I learn if I build this?
How I2C and SPI work at the bus level without a microcontroller hiding the details, how to read a sensor and log data from Python, why pull-up resistors and logic levels matter, and when a USB bridge is too slow compared with a native MCU bus.
