
Components keep shrinking. An 0201 footprint is smaller than a grain of rice, and hand-soldering parts that tiny takes a steady hand and a lot of luck. The machines that place them automatically have always lived in factories, behind six-figure price tags. That gap is exactly why this build matters: it drags professional-grade placement down to a workbench budget.
YouTuber MagmaBow set out to prove the gap could close, and built a four-axis pick-and-place machine for around $200. Instead of copying the industrial recipe of computer vision, automated tape feeders, and CAD-driven calibration, he kept a person in the loop. The result is a hybrid system that delivers a lot of the precision of a professional placer without the cost or the calibration headaches.
How it works
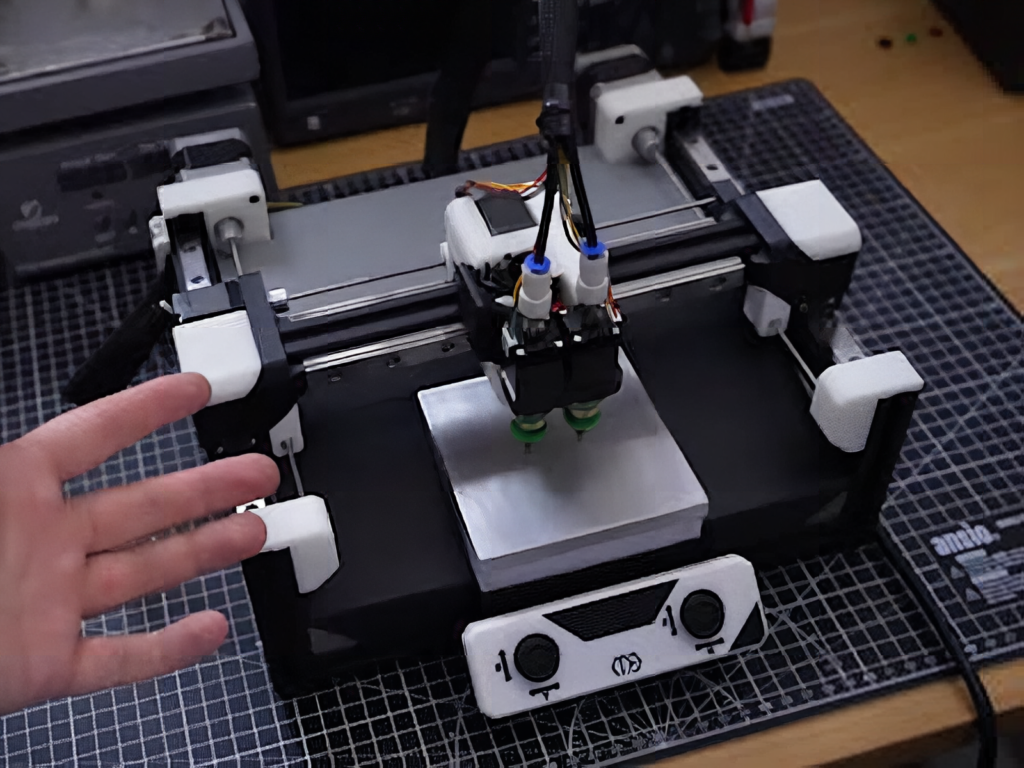
The operator drives the gantry with two joysticks. One handles X and Y motion, the other controls Z-height and nozzle rotation. Vacuum nozzles on the toolhead grab and release parts, and pressing down on a joystick toggles the vacuum pumps. The frame is 2020 aluminum extrusion on linear rails, with motion driven by stepper motors running off a repurposed Ultimaker motherboard built around the ATmega2560.
The clever part: motion without belts
Rather than belts or lead screws, MagmaBow used cheap M3 threaded rods. At 0.5 mm pitch with standard 200-step steppers, the math works out to a theoretical resolution of just a few microns per step. To kill backlash, pairs of compressed nuts preload the threads against each other. Structural pieces were printed in ASA, while the trickier bits — including the herringbone gears in the dual-nozzle selector — came off a resin printer, printed at zero clearance and then lapped smooth with an abrasive compound.
Build it yourself
MagmaBow released the design files and schematics as open source, so this is a real weekend-plus project, not just a teardown to admire. You would need 2020 extrusion and linear guides, four stepper motors, M3 threaded rod and brass nuts, an ATmega2560-based controller, small vacuum pumps and nozzles, plus access to both FDM and resin printers for the parts. In testing it placed everything from ICs down to 0201 resistors — proof that careful mechanical design can stand in for an expensive vision system.
Frequently Asked Questions
How does this machine stay accurate without computer vision?
It keeps a human operator in the loop. Two joysticks control the four-axis gantry while M3 threaded rods at 0.5 mm pitch and preloaded anti-backlash nuts give a theoretical resolution of a few microns per step, so mechanical precision replaces an expensive vision system.
What does it cost and what parts go into it?
MagmaBow built it for about $200 using 2020 aluminum extrusion, linear rails, four stepper motors, M3 threaded rod, an ATmega2560-based Ultimaker motherboard, small vacuum pumps and nozzles, plus FDM-printed ASA structures and resin-printed herringbone gears.
What will I learn if I build this?
You’ll get hands-on with multi-axis motion control, stepper motor driving and microstepping, anti-backlash mechanical design, vacuum-nozzle pick-and-place mechanics, and combining FDM and resin printing for functional parts — a strong crossover of CNC, electronics, and 3D printing skills.